.png) |
Onethinx LoRaWAN module
|


|
|
Onethinx LoRaWAN module
|
|
This guide will show you how to setup Visual Studio Code with the Onethinx Core dependencies pack.
cmake -versionmingw32-make -varm-none-eabi-gcc -vWindows
cmake -versionmingw32-make -varm-none-eabi-gcc -vMacOS
sudo apt install cmakeyourpath\VSCode_OnethinxPack_Linux/tools_2.0/linux/openocd/udev_rules/install_rules.shcd ~ && sudo nano .profilecmake -versionmake -varm-none-eabi-gcc -vLinux
In order to program a Onethinx LoRaWAN module, you need a programmer. You can also find our recomendations on our forum.
✅ MiniProg 4 < recommended
✅ KitProg 2 (fter voltage upgrade!! and upgrading to KitProg 3)
❔ KitProg 3
✅ Segger J-Link
❌ KitProg 1 Doesn’t work! (should work according to this topic, however not erised)
❔ ST Link (after converting to J-Link?)
❌ MiniProg 3 (Not working)
NOTE: If you find that a programmer that is not listed here either works or does not work with our module, please let us know on the forum.
Onethinx examples can be found on our Github page. For detailed explanation of the examples please see the Examples page of this document.
As we update our Onethinx module, newer versions of the Onethinx API and stack come out. Onethinx stack is programmed on the modules ARM Cortex M0+ core, while your application, which you will program on the ARM Cortex M4 core uses the Onethinx API to communicate with the stack. Not all stack versions support the same API version (there are versions of the stack that do support same API). Although we strive to have one single API version for all future stacks, updates are inevitable. Examples found on our Github, are usually updated to the latest API version. Onethinx API can be found on our Github page:
The API version you are using should always match the Stack version that is on the module according to this table:
| Stack Version | LoRaWAN API Version | LoRa API Version |
|---|---|---|
| 0xAD | 0xAD | not available |
| 0xAE | 0xAD | not available |
| 0xB0 | 0xB0 | not available |
| 0xB1 | 0xB1 | not available |
| 0xB2 | 0xB2 | not available |
| 0xB3 | 0xB2 | not available |
| 0xB4 | 0xB2 | not available |
| 0xB5 | 0xB2 | not available |
| 0xB6 | not public | not available |
| 0xB7 | not public | not available |
| 0xB8 | 0xB8 | 0xB8 |
| 0xB9 | 0xB8 | 0xB8 |
| 0xBA | 0xB8 | 0xB8 |
| 0xBB | 0xBB | 0xB8 |
| 0xBC | 0xBB | 0xB8 |
| 0xBD | not public | not public |
| 0xBE | 0xBE | 0xBE |
| 0xBF | 0xBE | 0xBE |
| 0xC0 | not public | not public |
| 0xC1 | 0xC1 | 0xC1 |
If the tables in this document are not up to date, please consult the tables found in the LoRaWAN API and LoRa API pages on our Github.
Dont know which stack version your module has? In order to find out which version of the stack your module has, you can copy and run a piece of code found here: Stack Version Code. Similar code can also be found on the bottom of this Github page.
NOTE: Once you find a stable version that suits you, you tested your device with it and you plan to go to mass production, we recommend to stick to that version when ordering modules.
In order to connect to a LoRaWAN network, you need a LoRaWAN gateway and LoRaWAN keys. Keys are
If you are using The Things Network (or some other public network), you may not need a gateway to test your LoRaWAN device because there may already be coverage in your area by a gateway somebody else has placed. Although this saves you some money not needing to put up your own gateway, we still recommend that you get your own gateway as this will save you a lot of time during development of your product as there are many things that can influence the connection. It is acceptable to use public gateways for prototyping. The public gateway may be far and the network conditions may be poor on a certain day, limiting your development. Also, the person that owns the public gateway, may decide they will unplug the gateway for a day, which will disable your connection to the Network Server. This is why, for serious development, we recommend having your own gateway.
Onethinx LoRaWAN module supports 1.0.2 LoRaWAN specification and is LoRa Alliance Certified for this version. In order to connect to any LoRaWAN network, the LoRaWAN stack needs to know these 3 parameters (keys):
In Onethinx project, the LoRaWAN keys are usually saved in LoRaWAN_keys.h header file. This header file is located in the project source folder: Project -> source -> OnethinxCore -> LoRaWAN_keys.h
In LoRaWAN_keys.h you will find an initalization structure, where you need to fill in the DevEUI (or use internal), AppEUI and AppKey. You can replace the zero (0x00) values in the structure with your keys.
You can use a different DevEUI:
Or use the internal unique DevEUI that is provided with every module:
There are several ways to read out or to extract Onethinx DevEUI from a Onethinx module:
LoRaWAN Keys and Connection
Now that you have installed Visual Studio Code, gotten a programmer/debugger, downloaded the examples (matched the API if needed), you can get started with the examples.
If you have access to a LoRaWAN gateway, we suggest to start with the "Hello World" example. If you do not have access to a LoRaWAN gateway or a LoRaWAN network in you vicinity, you can get started with the Lora2LoRa example. In order to use LoRaWAN you need access to a LoRaWAN gateway and/or network, however in order to use LoRa, you do not need these because you can achieve LoRa communication between 2 modules (at least). To get details and differences between LoRa and LoRaWAN I suggest that you go to the LoRa vs LoRaWAN page.
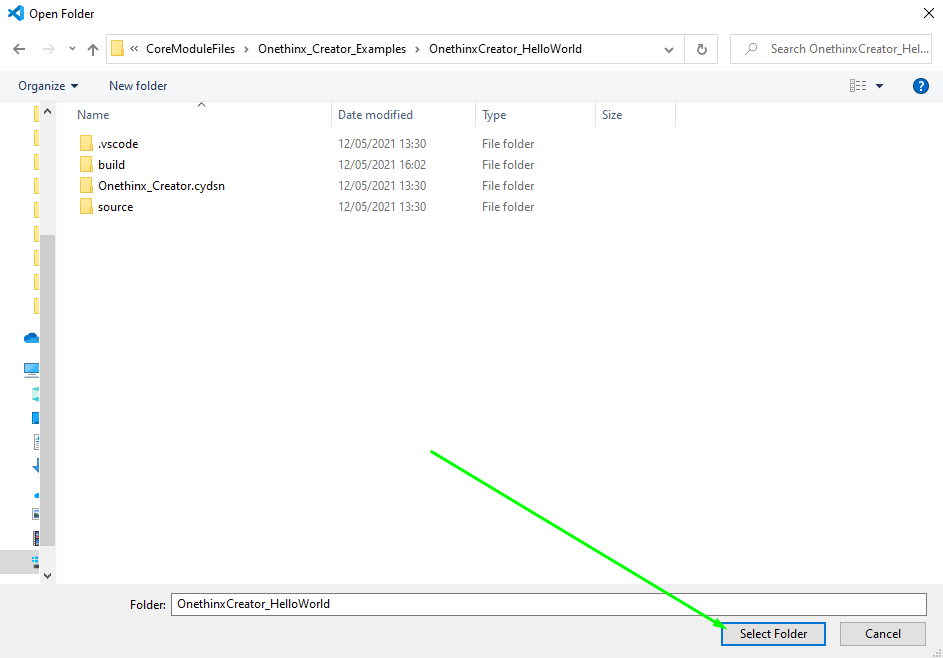
To run the example, please open VSCode. A wellcome page will open where you can start. Start by pressing "Open Folder" (Or go to: File->Open Folder) and select the folder with the example you wish to run.
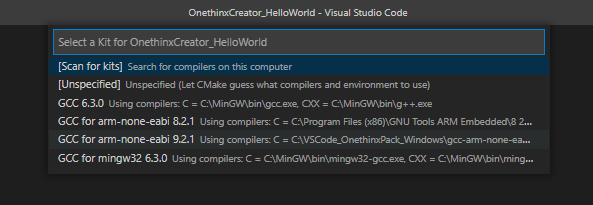
When opening the example for the first time (or when you move the project to a different folder), you will be asked to select the compiler. Select the latest GCC compiler you have installed. In this case, it is "GCC for arm-none-eabi 9.2.1".
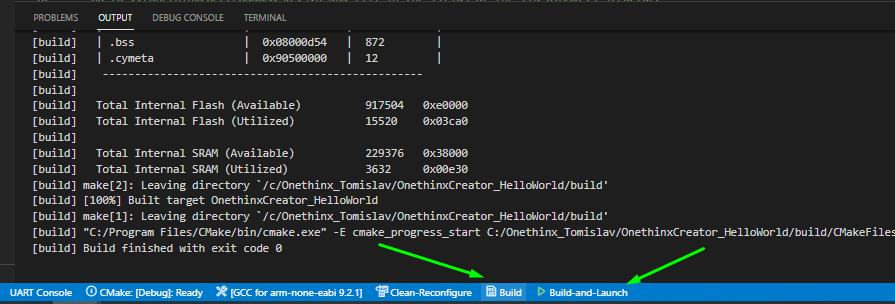
In order to build the code, you can press the "Build" button on the bottom, or press "Build and Launch" to Build and Launch debugging.
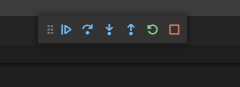
In the Debug mode, you can use the buttons on the top to:
Building and Debugging
In order to extract the full power of PSoC 6 dual ARM Cortex Core microcontroller, we recommend that you use PSoC Creator for the hadware set up. Although you can use only PSoC Creator to program PSoC chips, you are not able to use PSoC Creator on its own to program/debug/make project for Onethinx module. This is because PSoC Creator needs access to the M0+ core, while the M0+ core on the Onethinx module is locked. In order to use PSoC Creator as a "HW desing setup", you need to use Onethinx VSCode Project with it. You can download PSoC Creator here.
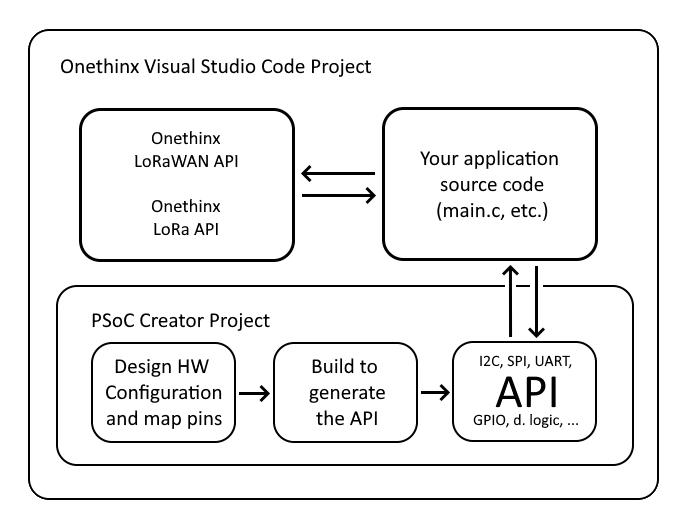
The PSoC Creator project which is used to generate the API is located in the Onethinx Visual Studio Code (VSC) project. When you make the hardware configuration (in Top Design) and assign pins (in Pins), only thing you need is to successfully build the project (with no errors), and an API usable by the VSC will be generated. After creation of the API in PSoC Creator, the only thing that is needed to be done in VSC in order for it to recognise the generated API from PSoC Creator is to do a "Clean-Reconfigure". "Clean-Reconfigure" button is located at the bottom of the screen, next to the "Build" button. No need to #include any API. You can start writing the code using the API straight away.
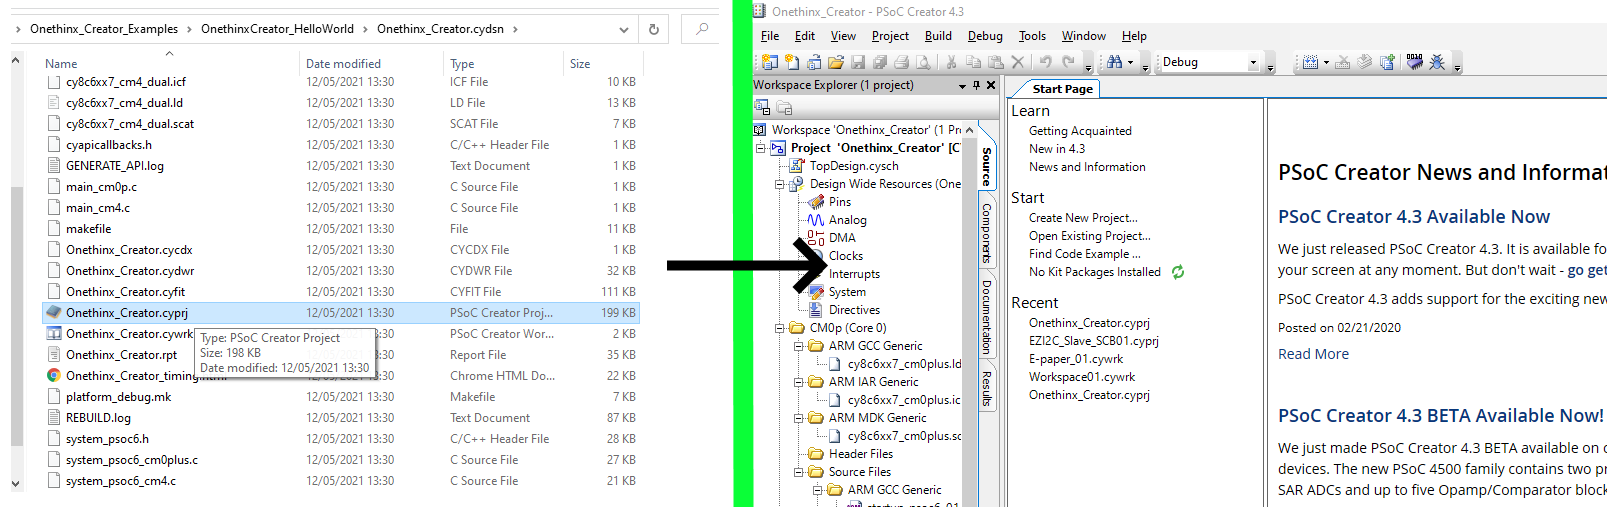
Open PSoC Creator Project by double clicking on the Onethinx_Creator.cyprj:
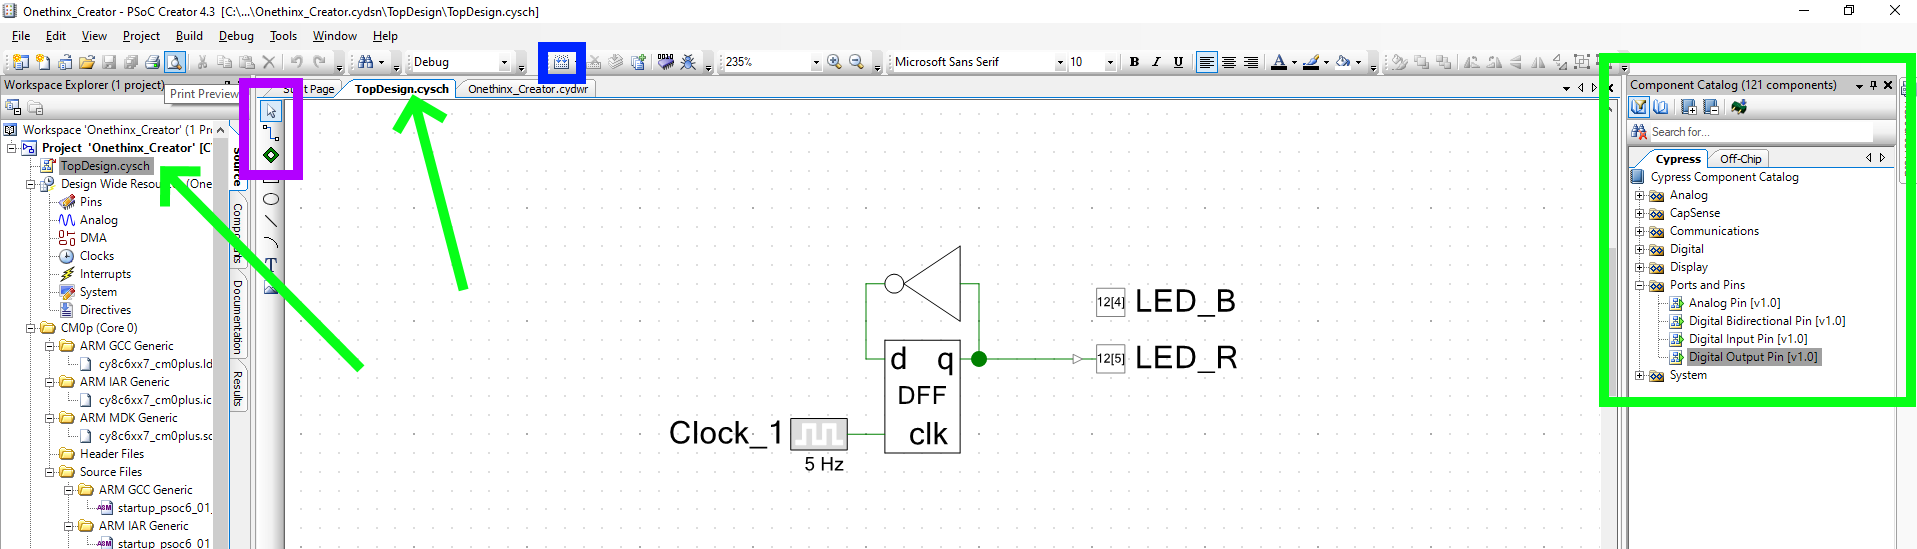
You can create your hardware configuration in TopDesign. You can place components found on the right in "Component Catalog", and after placing them, you can edit the component, its name and its settings by double clicking on it. You can connect the lines with the "Wire" tool found on the left side of the TopDesign (marked purple). (NOTE: VSC Errors after changing names or component in Creator).
Map your pins in the Pins tab. You can find which pins are available by checking out our Onethinx Datasheet.
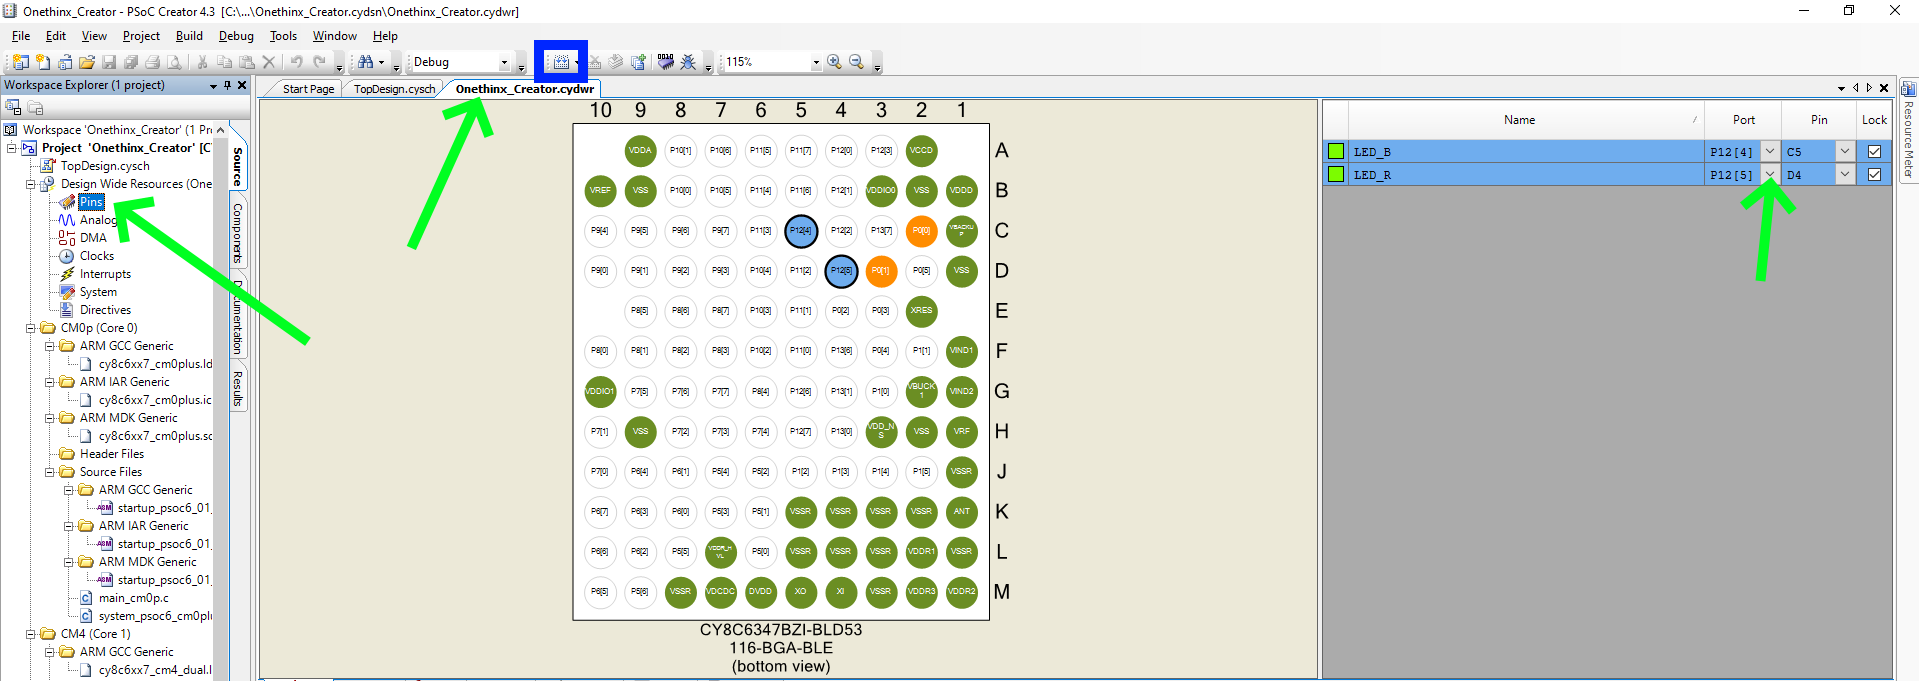
Use the "Build" button located in the top tray (marked with a blue box in both images). If successful, API will be generated which can be used in the VSCode project (after "Clean-Reconfigure"). API Datasheet can be found by right clicking on the specific component, while the API documentation can be found by going to Help->Documentation->Peripheral Driver Library.
NOTE: When building for the PSoC Creator project for the first time, if you get promted to replace some files, click Replace.
PSoC Creator
 1.9.0
1.9.0